מכונית שרואה מרחק — ומתחילה לזוזA car that senses distance — and starts moving
בשיעור 1 הדלקנו אור. בשיעור 2 קראנו חיישנים וקיבלנו החלטות. היום ניתן לרובוט שרירים: נבנה מכונית עם מנועי DC, גשר H וחיישן מרחק אולטראסוני.In Lesson 1 we switched on a light. In Lesson 2 we read sensors and made decisions. Today we give the robot muscles: DC motors, an H-bridge and an ultrasonic distance sensor.
המטרה הראשונה: הדרך פנויה ← נוסעים. מכשול קרוב או מדידה לא תקינה ← בולמים. אחר כך נוסיף פנייה.First goal: clear path → drive. Nearby obstacle or invalid reading → brake. Then add a turn.
2מה נלמד — ובאיזה סדרOur route through the lesson
קודם מביניםFirst understand
- איך חשמל יוצר סיבוב בתוך מנוע — ולמה יש בו מברשות וקומוטטור.How electricity produces rotation — and why the motor needs brushes and a commutator.
- למה צריך גשר H; איך מחליפים כיוון, גולשים ובולמים.Why an H-bridge is needed; how direction, coast and brake work.
- איך PWM משפיע על ההנעה ומה עושה תיבת ההילוכים.How PWM changes the drive and what the gearbox does.
אחר כך בוניםThen build
- שלב 1: בודקים מנוע אחד כשהגלגלים באוויר.Level 1: test one motor with the wheels raised.
- שלב 2: מכיילים שני צדדים ונוסעים / פונים.Level 2: calibrate both sides, drive and turn.
- שלב 3: בודקים מרחק בנפרד; שלב 4: משלבים למכונית מגיבה.Level 3: test distance separately; Level 4: combine into a reactive car.
3מי נותן פקודות — ומי מספק כוח?Who gives commands — and who supplies power?
מסלול הפקודותCommand path
הארדואינו קורא מרחק ושולח לגשר אותות: כיוון, הפעלה ו־PWM. האותות אומרים מה לעשות; הם אינם מספקים את זרם המנוע.The Arduino reads distance and sends direction, enable and PWM signals. These specify what to do; they do not supply motor current.
מסלול האנרגיהEnergy path
סוללה ← גשר ← מנועים ← חזרה לסוללה. בדוגמה שלנו הארדואינו מוזן מ־USB. ה־GND של הארדואינו, הדרייבר וסוללת המנועים משותף.Battery → bridge → motors → back to battery. In our example the Arduino runs from USB. Arduino ground, driver ground and motor-battery negative share a reference.
4בתוך מנוע DC: זרם הופך לכוחInside a DC motor: current becomes force
השדה והסלילThe field and the coil
מגנטים קבועים מחוברים לבית המנוע — הסטטור. סליל חוט מסתובב עם הציר — הרוטור. כשזרם עובר בסליל, הוא יוצר שדה מגנטי.Permanent magnets are fixed to the housing — the stator. A wire coil rotates with the shaft — the rotor. Current through that coil creates a magnetic field.
השדה של הסליל והשדה של המגנטים מפעילים כוחות על שני צדדי הסליל. הכוחות יוצרים מומנט: נטייה לסובב את הציר. אנרגיה חשמלית הופכת לתנועה, וגם לחום.The coil field and magnet field produce forces on opposite sides of the coil. They create torque: a turning effect on the shaft. Electrical energy becomes motion, with some lost as heat.
מודל עקרוני מפושט; לא הדמיית שדה או חתך בקנה מידה.Simplified conceptual model; not a field simulation or a scale drawing.
5למה המנוע ממשיך להסתובב?Why does the motor keep rotating?
בלי החלפה — הסליל יתיישרWithout switching — the coil aligns
אם כיוון הזרם בסליל היה נשאר קבוע, הסליל היה נוטה להתיישר עם השדה המגנטי, במקום להמשיך להסתובב באותו כיוון. צריך להחליף את החיבורים בזמן הנכון.If current in the coil kept the same direction, the coil would tend to align with the magnetic field rather than continue turning in one direction. Its connections must switch at the right point.
הקומוטטור עושה את ההחלפהThe commutator switches the connection
המברשות נוגעות בקומוטטור שמסתובב עם הציר. במודל סליל יחיד, שני חצאי הקומוטטור מחליפים את חיבורי הסליל בכל חצי סיבוב. הזרם בסליל מתהפך, והמומנט ממשיך לדחוף באותו כיוון.The brushes contact a commutator turning with the shaft. In a single-coil model, its two segments swap the coil connections every half-turn. Coil current reverses so torque continues in the same rotational direction.
במנוע אמיתי יש לרוב כמה סלילים ומקטעים, כדי להקטין תנודות ולשפר התנעה. גשר H הופך את כיוון הסיבוב הכולל; הקומוטטור מבצע את ההחלפות הפנימיות תוך כדי סיבוב.Real motors usually have multiple coils and segments for smoother torque and easier starting. The H-bridge reverses the overall rotation; the commutator handles the internal switching during rotation.
6שני חוטים — שני כיווניםTwo wires — two directions
מחברים ומחליפיםConnect, then reverse
A = +, B = −  →  rotation one way
A = −, B = +  →  rotation the other way
במנוע DC מוברש עם מגנטים קבועים, החלפת הקוטביות מחליפה את כיוון הזרם, ולכן את כיוון המומנט והסיבוב.In a permanent-magnet brushed DC motor, reversing polarity reverses current, torque and rotation.
מה זה ״קדימה״?What counts as “forward”?
״עם כיוון השעון״ תלוי מאיזה צד מביטים בציר. ״קדימה״ תלוי איך המנוע מותקן ברכב. המנועים בשמאל ובימין מותקנים כמראה — לכן נבדוק כל צד בנפרד.“Clockwise” depends on which end of the shaft you look at. “Forward” depends on how the motor is mounted. Left and right motors are mounted as mirror images, so we test each side separately.
7הגיר הצהוב: פחות מהירות, יותר מומנטThe yellow gearbox: less speed, more torque
ההנפשה מואטת פי 60. שני גלגלים משולבים מסתובבים בכיוונים מנוגדים.Animation slowed 60×. Two meshing gears rotate in opposite directions.
מחליפים מהירות במומנטTrade speed for torque
גלגל השיניים הקטן מניע את הגדול. ביחס 3:1, למונע יש פי שלושה שיניים: המנוע מסתובב שלוש פעמים בזמן שציר היציאה מסתובב פעם אחת.The small gear drives the large gear. At 3:1 the output has three times as many teeth: the motor turns three times for one output revolution.
אותו כוח במגע בין השיניים פועל במרחק גדול יותר מציר הגלגל הגדול. זרוע ארוכה יותר יוצרת יותר מומנט — במחיר של פחות סיבובים בדקה.The same contact force acts farther from the large gear’s shaft. A longer lever arm produces more torque, at the cost of fewer revolutions per minute.
Torque out = Torque in × ratio × η
שנו את היחס ואת סל״ד המנוע. בדקו 1:1 מול 4:1, ואז הפעילו הפסדים: יחס הסל״ד נשמר, אבל המומנט וההספק ביציאה יורדים.Change ratio and motor RPM. Compare 1:1 with 4:1, then enable losses: the RPM ratio stays the same, but output torque and power decrease.
8למה לא מחברים מנוע לפין של הארדואינו?Why not connect a motor to an Arduino pin?
זרם התנעה וזרם תקיעהStarting and stall current
בהתנעה הציר עדיין לא מסתובב. כשהמנוע מסתובב, הוא מייצר מתח נגדי (Back EMF) שמקטין את הזרם. כשהגלגל נתקע, המתח הנגדי יורד והזרם עלול לעלות מאוד.At startup the shaft is stationary. While spinning, a motor generates back EMF that reduces current. When a wheel stalls, back EMF falls and current can rise sharply.
פין בקרה מיועד לאותות בזרם קטן, לא לזרם התנעה של מנוע. הגשר מקבל את אנרגיית המנוע מהסוללה; הארדואינו נותן רק פקודות.A control pin handles small signal currents, not motor starting current. The bridge takes motor energy from the battery; the Arduino supplies commands.
סליל שומר אנרגיהA coil stores energy
כשמפסיקים זרם בסליל, השראות הסליל מתנגדת לשינוי ועלולה ליצור קפיצת מתח. צריך מסלולי זרם חוזר — דיודות מתאימות בדרייבר או במודול.When coil current is interrupted, inductance opposes the change and can create a voltage spike. Suitable recirculation paths are needed, using diodes in the driver circuit or module.
9למה צריך גשר H — ומה הוא עושה?Why do we need an H-bridge?
המחשב מחליט, הדרייבר מניעThe controller decides; the driver drives
הארדואינו יכול לבחור ״קדימה״ או ״אחורה״, אבל פין רגיל אינו מקור כוח למנוע. הוא לא יכול להחליף בעצמו את שני חוטי המנוע, וזרם התנעה של מנוע גדול מדי עבורו.The Arduino can choose “forward” or “reverse,” but an ordinary pin is not a motor power source. It cannot swap both motor leads, and motor starting current is too large for it.
גשר H הוא מעגל מיתוג שמחבר כל אחד משני הדקי המנוע לפלוס או למינוס של מקור המתח. כך הוא מאפשר להעביר זרם במנוע בשני הכיוונים, בלי לנתק ולהחליף חוטים ביד.An H-bridge is a switching circuit that connects either motor terminal to the positive or negative supply. It drives motor current in either direction without manually swapping wires.
ארבע הפעולות שנרצהFour actions we need
- הדק A לפלוס ו־B למינוס: סיבוב בכיוון אחד.A to positive and B to negative: turn one way.
- הדק B לפלוס ו־A למינוס: סיבוב בכיוון ההפוך.B to positive and A to negative: reverse rotation.
- ניתוק ההנעה: גלישה; חיבור ההדקים יחד: בלימה.Disable drive: coast; connect terminals together: brake.
- מיתוג מהיר בעזרת PWM: שינוי עוצמת ההנעה.Fast PWM switching: vary the drive level.
הגשר אינו מגביר את מתח הסוללה ואינו מקור אנרגיה. הסוללה מספקת כוח; הארדואינו שולט במתגים באמצעות הדרייבר. במכונית נשתמש בשני גשרים — אחד לכל צד.The bridge does not boost battery voltage or create energy. The battery supplies power; the Arduino controls switching through the driver. Our car uses two bridges, one per side.
10גשר H: ארבעה מפסקים במקום החלפת חוטיםThe H-bridge: four switches instead of swapping wires
המנוע הוא הקו האופקי של האות H. שני מפסקים מעליו מחברים את הדקיו ל־+, ושניים מתחתיו מחברים ל־−. סוגרים אלכסון כדי להעביר זרם דרך המנוע.The motor forms the horizontal bar of an H. Two upper switches connect its terminals to +, and two lower switches connect them to −. Close a diagonal pair to drive current through the motor.
11שני אלכסונים, גלישה ובלימהTwo diagonals, coasting and braking
נסיעהDrive
- S1 + S4: פלוס ← S1 ← A ← מנוע ← B ← S4 ← מינוס.S1 + S4: positive → S1 → A → motor → B → S4 → negative.
- S2 + S3: הזרם חוצה את המנוע בכיוון ההפוך.S2 + S3: current crosses the motor in the opposite direction.
- במעגל אמיתי המפסקים הם טרנזיסטורים, לא לחצנים מכניים.Real bridges use transistors rather than mechanical buttons.
עצירה אינה מצב יחידStopping has more than one mode
- גלישה: כל המפסקים פתוחים; לאחר שזרמי המעבר דועכים אין הנעה, אבל הגלגל ממשיך מכוח התנופה.Coast: all switches open; after transient currents decay there is no drive, but inertia keeps the wheel moving.
- בלימה: שני התחתונים סגורים. המנוע המסתובב מייצר זרם במעגל המקומי, שיוצר מומנט המתנגד לסיבוב.Brake: both lower switches close. The spinning motor generates current in the local loop, creating torque opposing rotation.
- בלימה חשמלית אינה נעילה מכנית ואינה מבטיחה עצירה במקום.Electrical braking is not a mechanical lock and does not guarantee an instant stop.
12הצירוף שאסור לסגור: שניים באותו צדNever close both switches on the same leg
קצר דרך הגשרShoot-through
S1 + S3 מחברים ישירות את + ל־− דרך הצד השמאלי. S2 + S4 עושים זאת בצד הימני. הזרם עוקף את המנוע ועלול לפגוע ברכיבים.S1 + S3 connect + directly to − through the left leg. S2 + S4 do the same on the right. Current bypasses the motor and may damage components.
איך שולטים בפועל?How do we control real hardware?
אנחנו שולחים ל־L298N פקודות לוגיות, ולא שולטים בארבעה טרנזיסטורים בנפרד. הדרייבר מתרגם אותן למצב גשר. אין לבלבל בין S1…S4 בתרשים לבין IN1…IN4 של מודול דו־ערוצי.We send logic commands to the L298N rather than controlling its four switches individually. The driver translates them into bridge states. Do not confuse diagram labels S1…S4 with IN1…IN4 on the two-channel module.
לפני שינוי כיוון בקוד נוריד Enable. בנוסף צריך לאפשר למנוע להאט לפני פקודת היפוך; ביטול Enable לבדו אינו עוצר את האינרציה.Our code lowers Enable before changing direction. The motor also needs time to slow before reversal; disabling Enable alone does not remove inertia.
13מזהים את הדרייבר האמיתי: מודול L298NMeet the actual hardware: the L298N module
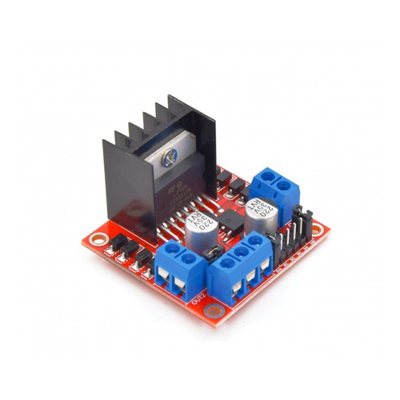 122345
שבב L298N וגוף הקירורL298N IC and heatsink
השבב מכיל שני גשרי H; גוף הקירור מפזר חלק מהחום.The IC contains two H-bridges; the heatsink dissipates some of the heat.
שני מסופי יציאה למנועיםTwo motor-output terminal blocks
לכל בלוק שני ברגים: OUT1/OUT2 ו־OUT3/OUT4. מחברים אליהם את שני צדי הרכב.Each block has two screws: OUT1/OUT2 and OUT3/OUT4. They connect to the two sides of the car.
מסוף הזנה בן שלושה חיבוריםThree-way power terminal
Vs למתח המנועים, GND משותף, ומסוף 5V ללוגיקה. תפקיד מסוף 5V תלוי במצב ג׳מפר המייצב ובלוח המסוים.Vs supplies motor power, GND is the shared reference, and 5V serves the logic supply. The 5V terminal role depends on the regulator jumper and actual board.
פיני בקרה וג׳מפרי EnableControl pins and Enable jumpers
ENA, IN1, IN2, IN3, IN4, ENB. מסירים את ג׳מפרי ENA/ENB כדי לחבר PWM מהארדואינו.ENA, IN1, IN2, IN3, IN4, ENB. Remove ENA/ENB caps to connect Arduino PWM.
קבלים ורכיבי ההזנה וההגנהCapacitors, supply and protection parts
הקבלים מסייעים בסינון ההזנה. מודולים נפוצים כוללים גם מייצב 5V ודיודות לזרם חוזר; בודקים את תיעוד הלוח.Capacitors help filter the supply. Common modules also include a 5V regulator and recirculation diodes; check the actual board documentation.
14מגשר עקרוני למודול L298NFrom a conceptual bridge to the L298N module
שני ערוצי מנועTwo motor channels
- ערוץ A: OUT1/OUT2 למנועים בשמאל; IN1/IN2 לכיוון; ENA להפעלה ול־PWM.Channel A: OUT1/OUT2 to the left motors; IN1/IN2 for direction; ENA for enable/PWM.
- ערוץ B: OUT3/OUT4 למנועים בימין; IN3/IN4 לכיוון; ENB להפעלה ול־PWM.Channel B: OUT3/OUT4 to the right motors; IN3/IN4 for direction; ENB for enable/PWM.
- בכל צד שני המנועים במקביל, עם קוטביות שנבדקה כך ששניהם דוחפים קדימה.Each side has two motors in parallel, with polarity checked so both push forward.
בודקים את העומס — לא רק את שם הרכיבCheck the load, not just the chip name
זרמי שני המנועים בכל צד מצטברים, כולל התנעה ותקיעה. בודקים את דירוגי המנועים והמודול המסוים לפני חיבור זוג; אם אין התאמה, משתמשים בדרייבר מתאים.The two motor currents on each side add together, including startup and stall. Check the motors and actual module before connecting a pair; use a suitable driver if ratings do not match.
ב־L298N יש נפילת מתח והספק שמתבזבז כחום. המתח על המנוע אינו בהכרח מתח הסוללה, וגוף קירור אינו הבטחה שהעומס מתאים.The L298N has voltage drop and dissipates heat. Motor voltage is not necessarily battery voltage, and a heatsink does not guarantee the load is acceptable.
15מצבי הבקרה של L298NL298N control states
X פירושו ״לא משנה״. ערוץ B פועל באותו עיקרון עם ENB ו־IN3/IN4. שתי כניסות HIGH כאן הן פקודה לוגית לבלימה — הן אינן סגירת שני טרנזיסטורים באותו צד של הגשר.X means “does not matter.” Channel B follows the same pattern with ENB and IN3/IN4. Two HIGH logic inputs request braking; they do not mean closing both transistors on one bridge leg.
16PWM: פולסים מהירים, כוח הנעה משתנהPWM: fast pulses, adjustable drive
ציר אופקי: זמן · אנכי: Enable נמוך / גבוה · המחשה מואטתHorizontal: time · vertical: Enable low / high · slowed illustration
ב־Uno, analogWrite(pin, value) משנה את אחוז הזמן שבו הפין HIGH: 0 כבוי, 255 פעיל תמיד. ב־128 הפולס פעיל בערך חצי מהזמן.On the Uno, analogWrite(pin, value) changes the fraction of time the pin is HIGH: 0 is off, 255 always active. At 128 it is active about half the time.
Enable מדליק ומכבה את ההנעה במהירות. השראות המנוע והאינרציה מחליקות חלק מהתגובה. 50% PWM אינו מבטיח 50% מהירות: עומס, חיכוך, סוללה ונפילות מתח משפיעים.Enable switches the drive rapidly. Motor inductance and inertia smooth part of the response. 50% PWM does not guarantee 50% speed: load, friction, battery and voltage drops all matter.
17מפת החיבורים — אותות הבקרהWiring map — control signals
מהארדואינו לגשרArduino to bridge
D5 ~←ENA · left PWMD2←IN1D3←IN2D4←IN3D7←IN4D6 ~←ENB · right PWMלחיישן המרחקDistance sensor
5V←HC-SR04 VCCGND←HC-SR04 GNDD9←TRIGD10←ECHOזו מפת חיבורים ל־Arduino Uno עם לוגיקת 5V. אין לחבר Echo של 5V ישירות לפין של בקר 3.3V. מסך ה־TM1637 משיעור 2 אינו מחובר בתרגיל הזה: D4/D5 משמשים כאן למנועים.This map is for a 5V-logic Arduino Uno. Do not connect a 5V Echo directly to a 3.3V controller pin. The Lesson 2 TM1637 display is disconnected here: D4/D5 are now used for motors.
18מפת החיבורים — הזנה ואדמה משותפתWiring map — power and common ground
מתח המנוע והזנת הלוגיקהMotor supply and logic supply
מתח הסוללה חייב להתאים למנועים ולמודול. הסימון ״12V״ על מסוף נפוץ אינו הוראה להשתמש ב־12V. אל תניחו שכל מנוע צהוב מתאים לאותו מתח.Battery voltage must suit both motors and module. A common “12V” terminal label is not an instruction to use 12V. Do not assume every yellow motor has the same voltage rating.
במודולים נפוצים ג׳מפר 5V-EN מפעיל מייצב, ומסוף 5V עשוי להפוך ליציאה. כשהמייצב מבוטל, הוא עשוי להיות כניסה להזנת לוגיקה. תפקודו וטווח המתח תלויים בלוח המסוים.On common modules, 5V-EN enables a regulator and the 5V terminal may become an output. With the regulator disabled, it may be a logic-supply input. Behavior and voltage limits depend on the actual board.
סדר עבודהBuild sequence
- מנתקים מתח בזמן חיווט; מאמתים את הוראות המודול ואת הזנת הלוגיקה שלו.Disconnect power while wiring; verify the actual module instructions and logic supply.
- מזינים את ה־Uno מ־USB. לא מחברים אליו יציאת 5V של הדרייבר.Power the Uno from USB. Do not connect a driver 5V output to it.
- מאמתים GND משותף, דיודות הגנה במודול, קוטביות וחיבורים לפני הפעלת סוללת המנועים.Verify common ground, module protection diodes, polarity and connections before switching on motor power.
19שלב 1: מנוע אחד על השולחןLevel 1: one motor on the bench
בודקים לפני שמרכיבים הכולTest before connecting everything
- מחברים מנוע אחד ל־OUT1/OUT2 ומרימים את הגלגלים מהשולחן.Connect one motor to OUT1/OUT2 and raise the wheels off the bench.
- מעלים קוד כשהסוללה למנועים כבויה. הקוד מתחיל כש־Enable נמוך.Upload with motor power off. The sketch starts with Enable low.
- מפעילים סוללת מנועים: סיבוב קצר, גלישה, סיבוב הפוך, עצירה.Switch motor power on: short spin, coast, reverse spin, stop.
- הניסוי מתבצע פעם אחת ב־setup. לא מחזיקים את הציר בכוח.The test runs once in setup. Do not restrain the shaft by hand.
הורדת ניסוי מנוע אחדDownload the one-motor test · level1_one_motor.ino
מכבים לפני שינוי כיווןDisable before changing direction
digitalWrite(ENA, LOW); // no drive
digitalWrite(IN1, HIGH);
digitalWrite(IN2, LOW);
analogWrite(ENA, 160);  // enable PWM
בסקץ׳ המלא יש הפסקה לפני היפוך. הסרת Enable נותנת גלישה, ולכן ממתינים שהגלגל יעצור לפני הפעלת כיוון הפוך.The full sketch pauses before reversal. Disabling Enable produces coasting, so wait for the wheel to stop before driving it in reverse.
הסקץ׳ המלאComplete sketch
// Arduino Uno + L298N. ENA/ENB jumper caps removed.
// Disconnect motor power while wiring/uploading; begin with wheels raised.
// Verify motor/module ratings and module-specific logic-supply wiring.
const byte ENA = 5, IN1 = 2, IN2 = 3;
const byte ENB = 6, IN3 = 4, IN4 = 7;
// Calibrate each side with wheels raised. These depend on physical mounting.
const bool LEFT_REVERSED = false;
const bool RIGHT_REVERSED = false;

void coastAll() {
  digitalWrite(ENA, LOW);
  digitalWrite(ENB, LOW);
}

void beginMotors() {
  pinMode(ENA, OUTPUT); pinMode(ENB, OUTPUT);
  coastAll();
  pinMode(IN1, OUTPUT); pinMode(IN2, OUTPUT);
  pinMode(IN3, OUTPUT); pinMode(IN4, OUTPUT);
  digitalWrite(IN1, LOW); digitalWrite(IN2, LOW);
  digitalWrite(IN3, LOW); digitalWrite(IN4, LOW);
}

void setMotor(byte en, byte a, byte b, int command, bool reversed) {
  command = constrain(command, -255, 255);
  if (reversed) command = -command;
  digitalWrite(en, LOW); // disable before changing direction inputs
  digitalWrite(a, command > 0 ? HIGH : LOW);
  digitalWrite(b, command < 0 ? HIGH : LOW);
  if (command != 0) analogWrite(en, abs(command));
  // command == 0 means COAST. brakeAll() is a separate operation.
}

void drive(int left, int right) {
  setMotor(ENA, IN1, IN2, left, LEFT_REVERSED);
  setMotor(ENB, IN3, IN4, right, RIGHT_REVERSED);
}

void brakeAll() {
  coastAll();
  digitalWrite(IN1, LOW); digitalWrite(IN2, LOW);
  digitalWrite(IN3, LOW); digitalWrite(IN4, LOW);
  digitalWrite(ENA, HIGH); digitalWrite(ENB, HIGH);
  // L298: enabled + equal direction inputs = electrical brake.
  // Braking generates current; check load ratings. Not a holding brake.
}

void setup() {
  beginMotors();
  delay(3000); // switch on motor power; wheels must be raised
  setMotor(ENA, IN1, IN2, 160, LEFT_REVERSED);
  delay(1000);
  coastAll(); delay(3000); // verify wheel is stopped before reverse
  setMotor(ENA, IN1, IN2, -160, LEFT_REVERSED);
  delay(1000);
  coastAll();
}
void loop() {} // reset to repeat; do not hold the shaft stalled20שלב 2: שמאל + ימין = היגויLevel 2: left + right = steering
מכונית עם היגוי דיפרנציאליDifferential steering
- קדימה: שני הצדדים דוחפים קדימה.Forward: both sides push forward.
- פנייה שמאלה: צד שמאל איטי או עצור, צד ימין מתקדם.Left turn: left side slow or stopped, right side drives forward.
- סיבוב במקום: שני הצדדים בכיוונים מנוגדים. דורש יותר אחיזה וזרם.Pivot: sides drive in opposite directions. This requires more traction and current.
- בודקים כל מנוע בקבוצה לפני חיבור שני מנועים במקביל.Check each motor in a group before pairing two motors in parallel.
הורדת בדיקת נסיעה ופנייהDownload drive and turn test · level2_drive.ino
כיוון מכני מול כיוון בקודMechanical direction versus code direction
const bool LEFT_REVERSED = false;
const bool RIGHT_REVERSED = false;

drive(160, 160); // logical forward
drive(0, 160);   // left coasts, right drives
הערכים הם נקודת התחלה, לא הבטחה להתקנה מסוימת. אם צד שלם נוסע הפוך, משנים את קבוע ה־REVERSED שלו. אם שני מנועים באותו צד נלחמים זה בזה, מתקנים את קוטביות המנוע הסורר כשהמתח מנותק.These are starting values, not a guarantee for a particular mounting. If a whole side runs backward, change its REVERSED constant. If two motors on one side oppose each other, disconnect power and fix the polarity of the mismatched motor.
הסקץ׳ המלאComplete sketch
// Arduino Uno + L298N. ENA/ENB jumper caps removed.
// Disconnect motor power while wiring/uploading; begin with wheels raised.
// Verify motor/module ratings and module-specific logic-supply wiring.
const byte ENA = 5, IN1 = 2, IN2 = 3;
const byte ENB = 6, IN3 = 4, IN4 = 7;
// Calibrate each side with wheels raised. These depend on physical mounting.
const bool LEFT_REVERSED = false;
const bool RIGHT_REVERSED = false;

void coastAll() {
  digitalWrite(ENA, LOW);
  digitalWrite(ENB, LOW);
}

void beginMotors() {
  pinMode(ENA, OUTPUT); pinMode(ENB, OUTPUT);
  coastAll();
  pinMode(IN1, OUTPUT); pinMode(IN2, OUTPUT);
  pinMode(IN3, OUTPUT); pinMode(IN4, OUTPUT);
  digitalWrite(IN1, LOW); digitalWrite(IN2, LOW);
  digitalWrite(IN3, LOW); digitalWrite(IN4, LOW);
}

void setMotor(byte en, byte a, byte b, int command, bool reversed) {
  command = constrain(command, -255, 255);
  if (reversed) command = -command;
  digitalWrite(en, LOW); // disable before changing direction inputs
  digitalWrite(a, command > 0 ? HIGH : LOW);
  digitalWrite(b, command < 0 ? HIGH : LOW);
  if (command != 0) analogWrite(en, abs(command));
  // command == 0 means COAST. brakeAll() is a separate operation.
}

void drive(int left, int right) {
  setMotor(ENA, IN1, IN2, left, LEFT_REVERSED);
  setMotor(ENB, IN3, IN4, right, RIGHT_REVERSED);
}

void brakeAll() {
  coastAll();
  digitalWrite(IN1, LOW); digitalWrite(IN2, LOW);
  digitalWrite(IN3, LOW); digitalWrite(IN4, LOW);
  digitalWrite(ENA, HIGH); digitalWrite(ENB, HIGH);
  // L298: enabled + equal direction inputs = electrical brake.
  // Braking generates current; check load ratings. Not a holding brake.
}

void setup() {
  beginMotors(); delay(3000);
  drive(160, 160); delay(800);
  brakeAll(); delay(1500);
  drive(0, 160); delay(400); // left coasts, right drives: turn left
  brakeAll(); delay(1500);
  coastAll();
}
void loop() {}21שלב 3: מזכירים לחיישן למדוד מרחקLevel 3: revisit distance sensing
מה מודדים בפועל?What is actually measured?
שולחים פולס TRIG של לפחות 10 מיקרו־שניות. החיישן משדר אולטרסאונד; רוחב פולס ECHO מייצג את זמן המסע הלוך וחזור.Send a TRIG pulse of at least 10 microseconds. The sensor emits ultrasound; the ECHO pulse width represents the round-trip travel time.
distanceCm = echoMicroseconds / 58.0;מחלקים בשניים מפני שהקול מגיע למכשול וחוזר. משאירים לפחות כ־60 מילי־שניות בין תחילות מדידה; בקוד משתמשים ב־70.Divide by two because sound travels to the obstacle and back. Leave at least about 60 milliseconds between measurement starts; our code uses 70.
הורדת בדיקת חיישן בלבדDownload sensor-only test · level3_distance.ino
אין הד אינו ״הכול פנוי״No echo does not mean “clear”
unsigned long us = pulseIn(ECHO, HIGH, 25000UL);
if (us == 0) return -1.0; // timeout
float cm = us / 58.0;
if (cm < 2 || cm > 400) return -1.0;
return cm;
משטח רך או אלכסוני, חפץ קטן, טווח קצר מדי ורעש עלולים לשבש מדידה. אין דרך להבחין בוודאות בין ״רחוק מאוד״ ל״לא התקבל הד״. המכונית שלנו בולמת במדידה לא תקינה.Soft or angled surfaces, small objects, too-close targets and noise can disrupt readings. “Very far away” cannot reliably be distinguished from “no echo.” Our car brakes on invalid readings.
22שלב 4: חיישן ← החלטה ← מנועיםLevel 4: sensor → decision → motors
הדמיית ההחלטה בלבד; הרכב נשאר במקום כדי להציג את המרחק.Decision simulation only; the car stays in place to display distance.
if (distanceCm < 0 || distanceCm <= STOP_CM) {
  moving = false;
} else if (distanceCm >= RESUME_CM) {
  moving = true;
}
// STOP_CM = 20; RESUME_CM = 25;
בדוגמה המלאה שומרים משתנה moving. עד 20 ס״מ בולמים; רק מ־25 ס״מ חוזרים לנסוע. בין הספים שומרים את ההחלטה הקודמת — היסטרזיס שמפחית ריצוד.The full example stores a moving state. Brake at 20 cm or less; resume only at 25 cm or more. Between thresholds, retain the previous decision — hysteresis reduces chatter.
הקוד נפתח בבלימה. זהו סף לימודי שיש לכייל לפי מהירות, רצפה, השהיית חיישן ומרחק עצירה אמיתי.The sketch starts braked. These are teaching thresholds to calibrate for speed, floor, sensor delay and actual stopping distance.
הורדת המכונית עם עצירת מכשולDownload obstacle-stop car · level4_obstacle_stop.ino
23קוראים את הקוד כמו סיפורRead the code like a story
לולאה קצרה וברורהA short, clear loop
float distanceCm = readDistanceCm();

if (distanceCm < 0 || distanceCm <= STOP_CM) {
  moving = false;
} else if (distanceCm >= RESUME_CM) {
  moving = true;
}

if (moving) drive(CRUISE_PWM, CRUISE_PWM);
else brakeAll();

delay(70);
הפרדה לפונקציותSeparate responsibilities
readDistanceCm()עוסקת במדידה ומחזירה −1 כשאין מדידה תקינה.readDistanceCm()handles sensing and returns −1 for invalid readings.drive(left, right)מקבלת ערכים חתומים: סימן לכיוון וגודל ל־PWM.drive(left, right)takes signed values: sign selects direction, magnitude selects PWM.coastAll()מבטלת Enable;brakeAll()מפעילה Enable עם שני קלטי כיוון LOW.coastAll()disables Enable;brakeAll()enables with both direction inputs LOW.- 70ms ועוד זמן המדידה הם זמן ללא החלטה חדשה. אין כאן עצירה מיידית או מערכת מניעת התנגשות מובטחת.70ms plus measurement time passes without a new decision. This is not instantaneous stopping or guaranteed collision prevention.
24תוספת: בולמים, פונים ובודקים מחדשExtension: brake, turn and check again
אסטרטגיה ראשונה לפנייהA first turning strategy
כשמכשול קרוב: בולמים, מחכים בקצרה, ואז צד שמאל גולש וצד ימין מתקדם לזמן מוגבל. עוצרים ומודדים מחדש. אם עדיין קרוב — נשארים בעצירה לבדיקה הבאה.When an obstacle is near: brake, wait briefly, then let the left side coast while the right drives for a limited time. Stop and measure again. If still close, remain stopped for the next check.
אין חיישן מאחור או בצדדים, לכן הדוגמה לא נוסעת אחורה. גם בזמן פנייה החיישן הקדמי אינו רואה את כל היקף הרכב — בודקים בשטח פנוי ובהשגחה.There is no rear or side sensor, so this example does not reverse. The front sensor cannot see the whole perimeter during a turn; test in open space under supervision.
הורדת תרגיל פנייהDownload turning extension · bonus_turn.ino
למה לא להשתמש רק ב־delay ארוך?Why avoid long blocking delays?
אם מחכים חצי שנייה ב־delay, אי אפשר לקבל החלטת חיישן חדשה בתוך ההמתנה. בתוספת משתמשים במצבים וב־millis() כדי לתזמן את הפנייה, וממשיכים לדגום חיישן.A half-second delay prevents a fresh sensor decision during that wait. The extension uses states and millis() to time the turn while continuing to sample the sensor.
גם pulseIn חוסמת לזמן מוגבל, ולכן זו עדיין מערכת לימודית עם השהיות, לא בקר בזמן אמת קשיח.pulseIn still blocks for a bounded interval, so this remains a teaching system with latency, not a hard real-time controller.
25כשהמכונית לא עושה מה שציפינוWhen the car does something unexpected
תנועה והזנהMotion and power
- אין תנועה: בודקים סוללה, מתג, הזנת לוגיקה, GND משותף, ENA/ENB וערך PWM.No motion: check battery, switch, logic supply, common ground, ENA/ENB and PWM.
- צד אחד לא עובד: בודקים מנוע בודד וחיווט הערוץ, כשהמתח מנותק לפני החלפה.One side fails: test a single motor and channel wiring, disconnecting power before changes.
- איפוס הארדואינו: ייתכנו נפילת מתח או הפרעות מנועים. בודקים ספק, חיבורים וניתוב הזנה.Arduino resets: supply sag or motor noise may be involved. Check supply, connections and power routing.
- דרייבר מתחמם / מנוע תקוע: מכבים ובודקים עומס, חיכוך וזרם.Hot driver / stalled motor: switch off and inspect load, friction and current.
מרחק והחלטותDistance and decisions
- ערכים קופצים: בודקים מול משטח שטוח, מקבעים חיישן ומפרידים חוטי אות מחוטי מנוע.Jumping readings: test against a flat target, secure the sensor and separate signal wires from motor wiring.
- בולם תמיד: בודקים את Serial ב־9600, TRIG/ECHO ומדידות INVALID לפני שינוי הסף.Always braked: inspect Serial at 9600, TRIG/ECHO and INVALID readings before changing the threshold.
- מתנגש למרות המדידה: מורידים מהירות, מגדילים מרחק עצירה ובודקים משטחים שלא מחזירים הד.Collides despite sensing: reduce speed, increase stop distance and check poorly reflecting surfaces.
- רועד סביב הסף: בודקים שהקוד שומר מצב ושיש פער בין ספי עצירה וחזרה.Chatters at threshold: check retained state and the gap between stop and resume thresholds.
26משימות: להסביר, לחזות, למדודChallenges: explain, predict, measure
בודקים הבנהCheck understanding
- לפני לחיצה על ״אחורה״, ציירו את מסלול הזרם ואת שני המפסקים הסגורים.Before pressing Reverse, draw the current path and identify the two closed switches.
- מה ההבדל בין גלישה לבלימה? מדוע גלגל עשוי להמשיך להסתובב כש־Enable נמוך?How do coast and brake differ? Why might a wheel keep turning with Enable low?
- למה צריך גם קומוטטור בתוך המנוע וגם גשר H מחוץ לו?Why are both an internal commutator and an external H-bridge needed?
ניסוי בבית או בכיתהA classroom or home experiment
- השוו זמן עצירה בגלישה ובבלימה, באותה מהירות התחלתית ובתנאי עומס מתאימים.Compare coast and brake stopping times from the same initial speed within suitable load limits.
- בדקו PWM של 120, 160 ו־200: האם מהירות הרכב עולה ביחס ישר?Try PWM values 120, 160 and 200: does vehicle speed increase proportionally?
- מצאו סף עצירה מתאים במהירות נמוכה, ושנו רק פרמטר אחד בכל ניסוי.Find a suitable low-speed stopping threshold, changing only one parameter per test.
- הסבירו מה עושים כשהמדידה לא תקינה — ולמה לא מתייחסים אליה כמרחק אינסופי.Explain the invalid-reading policy and why it is not treated as infinite distance.
27מה בנינו — ולאן ממשיכיםWhat we built — and what comes next
המעגל השלםThe complete loop
חיישן המרחק חש, הארדואינו חושב, והגשר והמנועים פועלים. עכשיו יש קשר בין מה שהרובוט מודד לבין התנועה שלו.The distance sensor senses, the Arduino thinks, and the bridge and motors act. What the robot measures now changes how it moves.
הבנו איך סליל ומגנטים יוצרים מומנט, למה מחליפים זרם, איך גשר H משנה כיוון, ואיך PWM משנה הנעה.We explored how coils and magnets create torque, why current is switched, how an H-bridge changes direction, and how PWM changes drive.
כל הקוד — הסבר, העתקה והורדהAll code — explanation, copy and download
להעמקה ולבדיקת פרטיםReferences and further reading
- ST · L298 datasheet — control states & electrical limits
- Arduino · PWM & supported pins
- HC-SR04 · timing & ranging