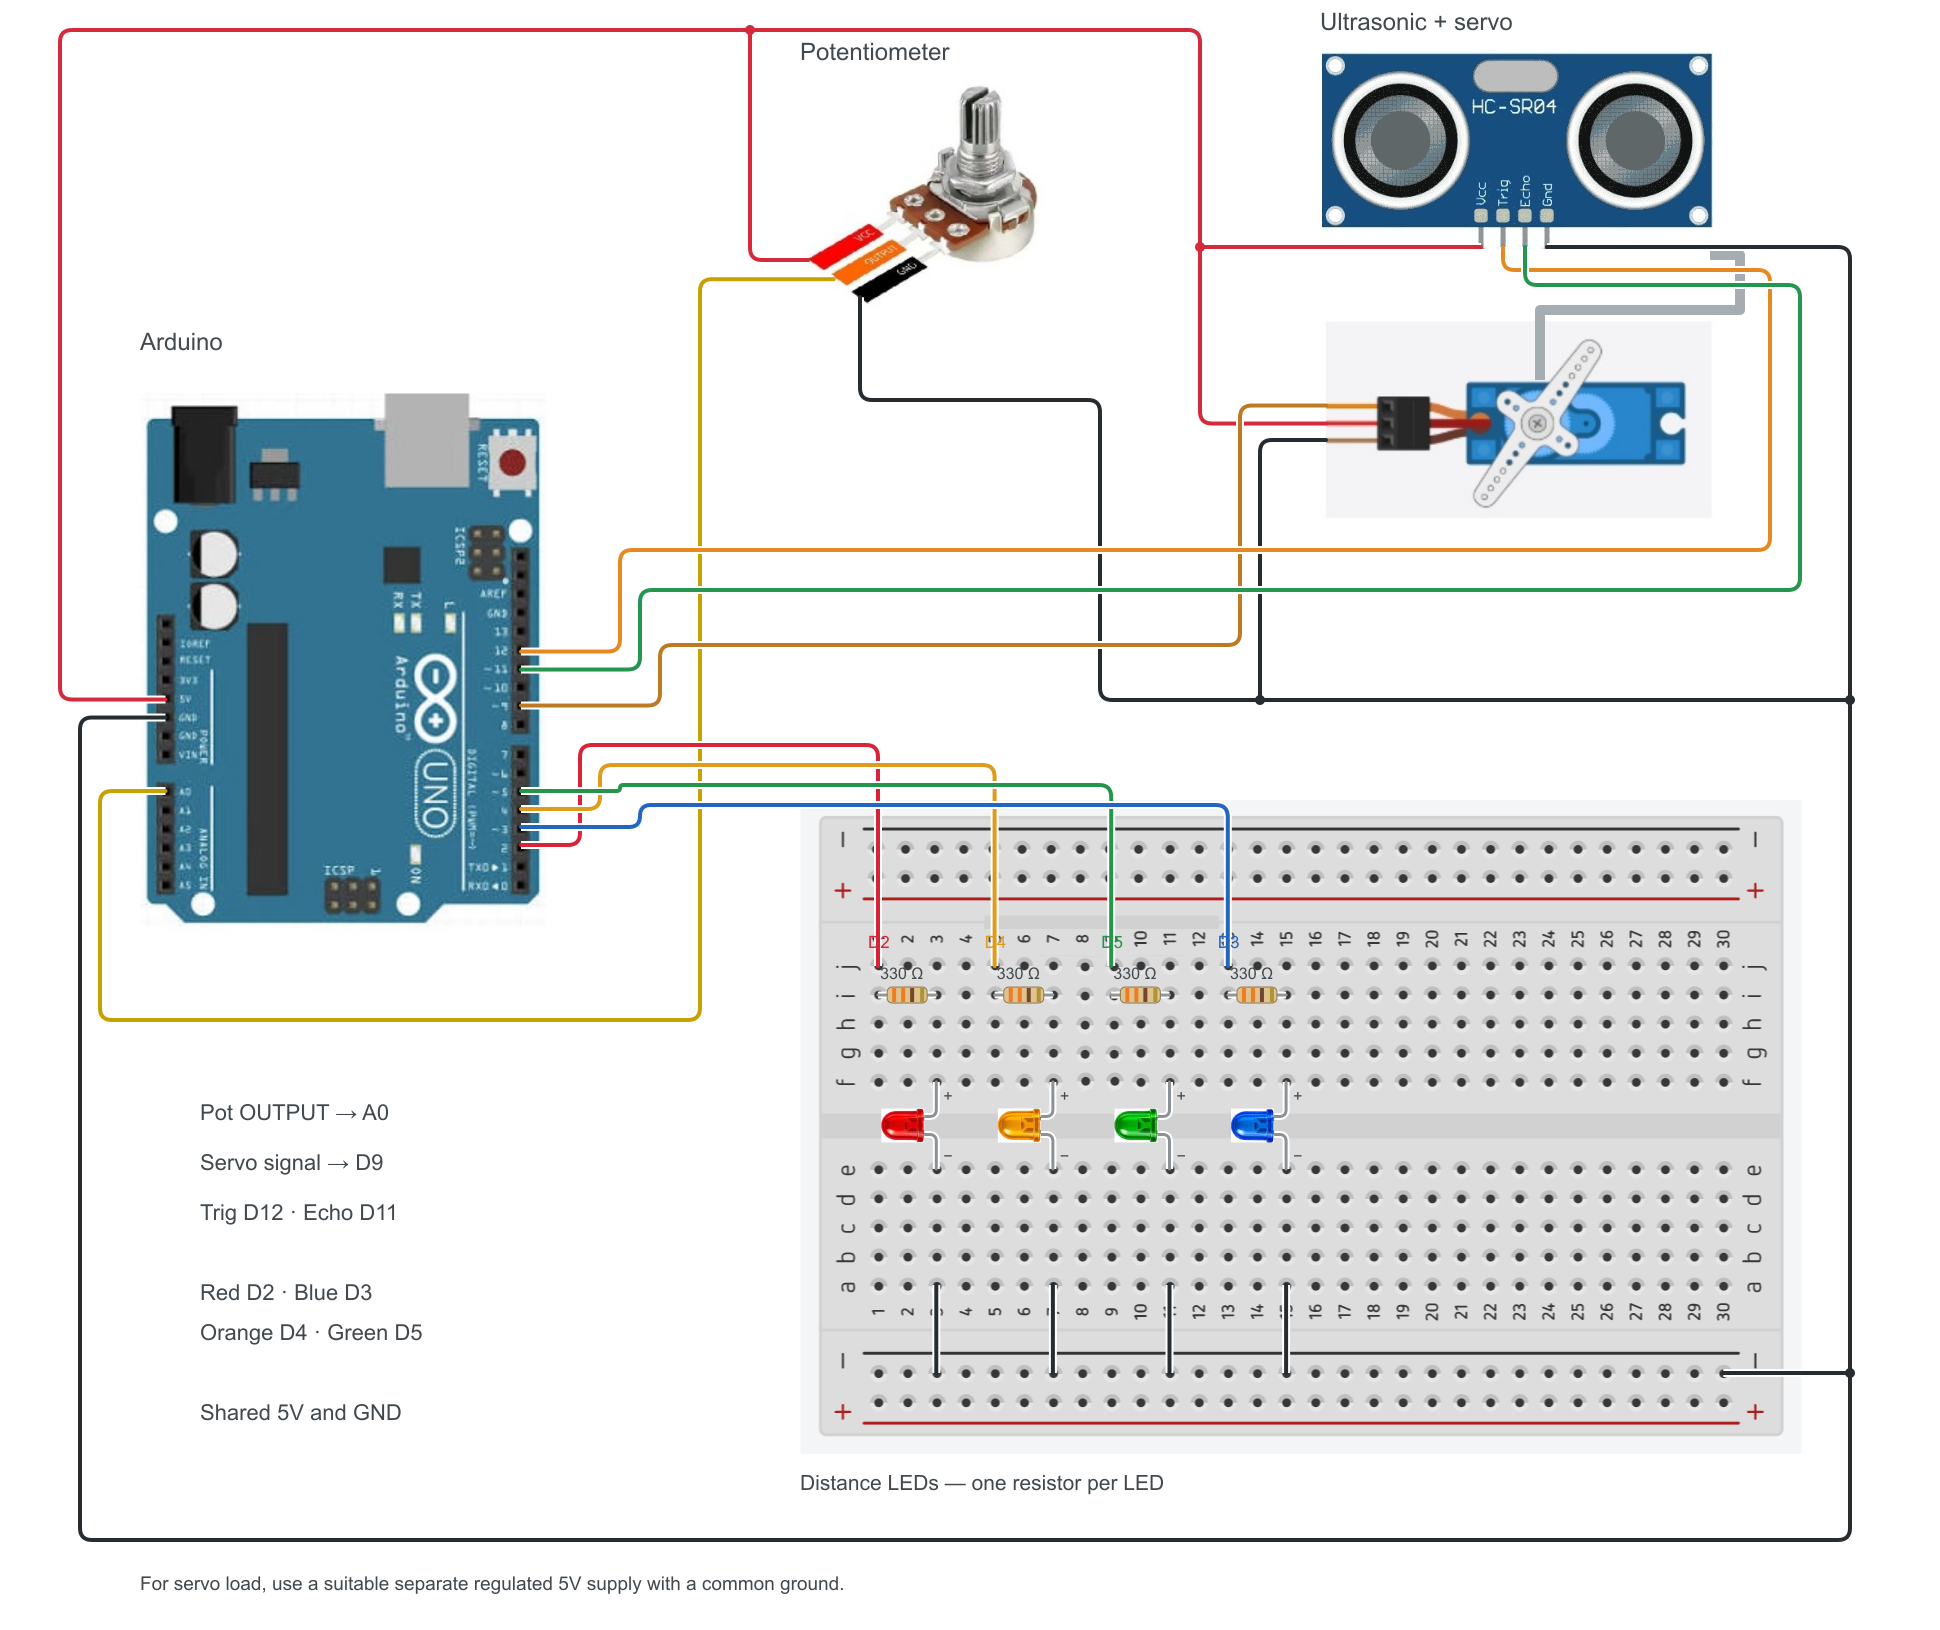
Project 10
Pot, servo and ultrasonic
The code.
#pragma region // Declare

// - Servo
#include <Servo.h>
Servo myServo;

const int SERVO_PIN  = 9;	// => PIN 9

const int SERVO_MIN  = 15;   // Servo min lim - angle
const int SERVO_MAX  = 165;  // Servo max lim - angle

// - Pot
const int POT_PIN    = A0;	// => PIN A0

// - Ultrasonic
const int ECHO_PIN   = 11;	// => PIN 11
const int TRIG_PIN   = 12;	// => PIN 12

float currDistance = 0.0;	// Global distance
long  echoDuration = 0;		// Global Duration

// - Leds
const int RED_LED    = 2;	// => PIN 2
const int BLUE_LED   = 3;	// => PIN 3
const int ORANGE_LED = 4;	// => PIN 4
const int GREEN_LED  = 5;	// => PIN 5


#pragma endregion

// Setup
void setup() {
  Serial.begin(9600);

  // Attach Servo
  myServo.attach(SERVO_PIN);

  // Configure Sensor Pins
  pinMode(TRIG_PIN, OUTPUT);
  pinMode(ECHO_PIN, INPUT);

  // Configure LED Pins
  pinMode(RED_LED, OUTPUT);
  pinMode(BLUE_LED, OUTPUT);
  pinMode(ORANGE_LED, OUTPUT);
  pinMode(GREEN_LED, OUTPUT);
}

// Run
void loop() {
  controlServo();   // 1. Read pot, map angle, move radar servo
  readDistance();   // 2. Fire ultrasonic, scan the area
  updateLEDs();     // 3. Update the color indicator based on distance rules

  delay(50);        // Smooths out execution loops and avoids sensor spam
}

// Logic

======================================

// --- FUNCTION 1: Read Potentiometer & Rotate Servo ---
void controlServo() {
  int potValue = analogRead(POT_PIN);
  int targetAngle = map(potValue, 0, 1023, SERVO_MIN, SERVO_MAX);
  myServo.write(targetAngle);

  Serial.print("Angle: ");
  Serial.print(targetAngle);
}

// --- FUNCTION 2: Fire Ultrasonic Sensor ---
void readDistance() {
  digitalWrite(TRIG_PIN, LOW);
  delayMicroseconds(2);
  digitalWrite(TRIG_PIN, HIGH);
  delayMicroseconds(10);
  digitalWrite(TRIG_PIN, LOW);

  echoDuration = pulseIn(ECHO_PIN, HIGH, 30000); 	// Block i/o ; Measure time ; timeout 30ms
  currDistance = echoDuration * 0.0343 / 2.0;	// Duration ; speed of sound (cm/μs) ; twice go and back

  Serial.print(" | Distance: ");
  Serial.print(currDistance);
  Serial.println(" cm");
}

// --- FUNCTION 3: Handle LED Logic Rules ---
void updateLEDs() {

  // Reset leds before evaluation
  allLedsOff();

  if (echoDuration <= 0){								// Timeout - Err
    digitalWrite(BLUE_LED, HIGH);
  }
  else if (currDistance = 2 || currDistance > 50) {		// Blind -or- Out of range ( 2 >= range <= 50)
    digitalWrite(BLUE_LED, HIGH);
  }
  else if (objDistance > 2 && objDistance < 20) {		// Under - up to 20 cm
    digitalWrite(LED_YELLOW, HIGH);
  }
  else if (objDistance >= 20 && objDistance <= 30) {	// Sweetspot - 20 to 30 cm
    digitalWrite(LED_GREEN, HIGH);
  }
  else if (objDistance > 30 && objDistance <= 50) {		// Over - 30 to 50 cm
    digitalWrite(LED_RED, HIGH);
  }

}

// Helping funcs
void allLedsOff(){
  digitalWrite(LED_RED, LOW);
  digitalWrite(LED_YELLOW, LOW);
  digitalWrite(LED_GREEN, LOW);
  digitalWrite(LED_BLUE, LOW);
}